| Cascade DataHub™ for Linux and QNX : Version 6.4 | ||
|---|---|---|
 | Chapter 2. Using the Cascade DataHub |  |
The Cascade DataHub can mirror data with one or more other DataHubs in running in Windows, as well as Linux or QNX, across a LAN, WAN, or the Internet, using TCP. Mirroring means that the data and any updates to that data on one DataHub are exactly mirrored across the network onto another DataHub, and vice-versa. The only difference between the master DataHub and slave DataHub is that the slave initiates the connection, and a connection license is consumed on the master. Once the connection is established, they function exactly the same.
Each participating DataHub must be configured as mirroring master (server) or mirroring slave (client), or in some cases, both. If your system requires it, a single DataHub can act as a master to one DataHub and as a slave to another.
![[Important]](images/important.gif) | Each master-slave pair must have matching port numbers and domain names. Specifying port numbers and domain names is explained below. |

There are three possible ways to set this up:
To have the Windows DataHub initiate the connection, you would need to set it up as a slave, and set up the Linux or QNX DataHub as a master.
To have the Linux or QNX DataHub initiate the connection, you would need to set it up as a slave, and set up the Windows DataHub as a master.
As a third alternative, you can use Cascade Connect instead of the DataHub in Windows, however you must keep in mind that Cascade Connect always functions as a slave, and it only connects to DDE-enabled programs. Please refer to the Cascade Connect manual for details on setting it up for mirroring. You would set it up the Linux or QNX DataHub as a master

For this scenario, you would set up whichever DataHub you wanted to initiate the connection as a master, and set up the other DataHub as a slave.
You can set up the Cascade DataHub to act as a mirroring master on Linux or QNX in either of these two ways:
Run the DataHub with the -p option. This tells the Cascade DataHub to listen as a TCP master on the port or service you specify. Normally you would use port 4600, which we have arbitrarily chosen as the "normal" port, but any port number will do so long as the client (slave) uses the same port number.
[sh]$ datahub -p port/service
For example:
[sh]$ datahub -p 4600
Create a configuration file or use an existing one. Make sure the following lines are in the file:
(tcp_service 4600)
(enable_tcp_server 1)
(enable_mirror_master 1)
Then run the DataHub with the -f option:
[sh]$ datahub -f /path/to/my/configfile.cfg
For example:
[sh]$ datahub -f /usr/local/misc/dhconfig.cfg
You can set up the Cascade DataHub to act as a mirroring slave on Linux or QNX in either of these two ways:
Run the DataHub with the -m, -M and -n options.
[sh]$ datahub -m port -M address -n domain
For example:
[sh]$ datahub -m 4600 -M 192.168.3.15 -n test
Create a configuration file or use an existing one. Make sure the following lines are in the file:
(create_domain domainM)
(mirror_master address port domainS domainM)
(enable_mirror_slave 1)
The create_domain command is optional. It is used in this example to show how to make a domain on the slave DataHub that matches a domain on the master DataHub. The mirror_master command then sets up mirroring from domainM on the master to a different domain, domainS, on the slave. You can also mirror domains with the same name, say default, by simply specifying the same domain name for master and slave:
(mirror_master 192.168.3.15 4600 default default)
Once the file is ready, run the DataHub with the -f option:
[sh]$ datahub -f /path/to/my/configfile.cfg
For example:
[sh]$ datahub -f /usr/local/misc/dhconfig.cfg
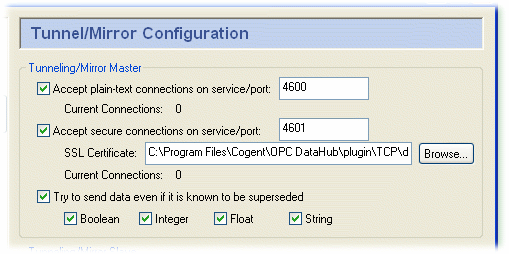
The box is checked by default, with the service/port set at 4600. Normally you won't have to change these settings.

![[Important]](images/important.gif) | If you enter a name for the service/port instead of a number, that name must be listed in the Windows services file. Please refer to The Windows Services file Appendix for details. |
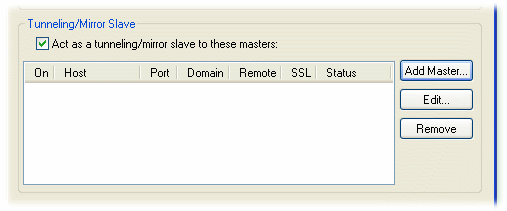
Check the box to have the Cascade DataHub act as a slave.

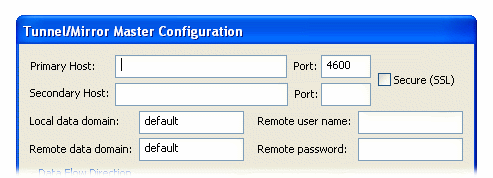
To edit a master, double-click it or select it and press the button, and edit the fields described below. To add a master for this mode, click the button. Either button will open the Tunnel/Mirror Master window:

Type in the following information:
The name or IP address of the host computer.
The port number or service name as entered in the Master service/port entry box of the master on the remote computer. The system default is the number that appears in the Master service/port entry box above. It is common, but not necessary, to have these two numbers (or names) the same.
The local Cascade DataHub data domain for this slave.
The remote Cascade DataHub data domain, which is on the master computer. Point names will be mapped from the remote data domain (on the master) into the local data domain (on this slave), and vice versa.
![[Note]](images/note.gif) | There is a DataHub running on Cogent's server that you can connect to for testing. Here are the parameters you will need to enter for it: Host Name: developers.cogentrts.com Service/Port: 4600 Local data domain: test Remote data domain: test |
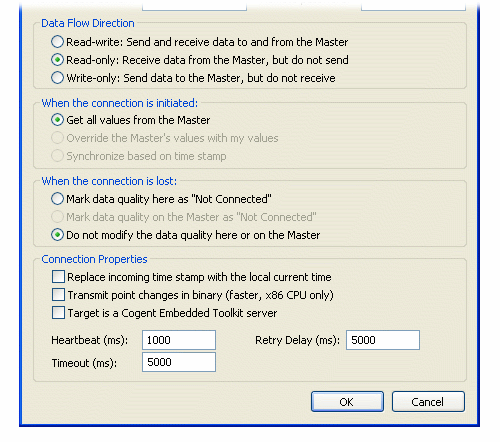
You now have several options for the mirrored connection.

![[Note]](images/note.gif) | If you have configured When the connection is initiated as (see above), then this option must be set to to get correct data synchronization. |
Copyright © 1995-2010 by Cogent Real-Time Systems, Inc. All rights reserved.