| Cascade DataHub™ for Linux and QNX : Version 6.4 | ||
|---|---|---|
 | Chapter 2. Using the Cascade DataHub |  |
| Cascade DataHub™ for Linux and QNX : Version 6.4 | ||
|---|---|---|
| | Chapter 2. Using the Cascade DataHub | |
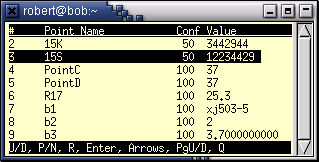
You can see what's happening in the Cascade DataHub using the Cascade DataHub Viewer utility. It can operate in any of three modes: console, QNX Photon, and X Windows.
Type dhview at the shell prompt to start the viewer.
Move the selection bar by pressing the up and down arrows.
Scroll up and down a line at a time by pressing the U and D keys; or a page at a time by pressing the P and N keys or PgUp and PgDn.
You can change data point values in the Cascade DataHub from the DataHub Viewer.
![[Important]](images/important.gif) | New values get written as soon as the Enter key is pressed. |
Choose a point by moving the selection bar to the desired point and pressing Enter. A small dialog box opens that allows you to edit the point's value, confidence, and security.
Edit a chosen point by pressing the Backspace key to delete the existing entry; then type in the new information. Use the Tab key to move between fields. Use the Esc key to close the dialog window, ignoring any changes and keeping the original entry. Use the Enter key to enter the changes and close the dialog box.
Retransmit all points from the DataHub to the viewer by pressing the R key. This is useful to see those points that were created but haven't been assigned a value, such as through a call to the Gamma function read_point or register_point.
Type Q to quit the Cascade DataHub Viewer.
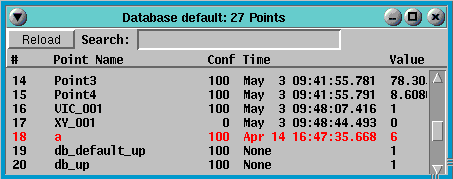
In addition to the features in console mode, the Photon mode of the Cascade DataHub Viewer has a search feature, and its display includes a timestamp field. It also highlights in red any locked points.
Type phdhview at the shell prompt to start the viewer.
Scroll up and down by using the scrollbar, the arrow keys, or PgUp and PgDn.
Find a point by typing its name in the Search entry field.
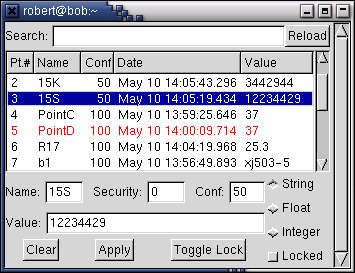
You can change data point values in the Cascade DataHub from the DataHub Viewer.
| New values get written as soon as the button is pressed. |
Choose a point by clicking on it. A small dialog box opens that allows you to edit the point's value, confidence, security, and locked status.
Edit a chosen point by deleting the existing entry; then type in the new information. Use the Tab key or click the mouse to move between fields. Press the button to close the dialog window, ignoring any changes and keeping the original entry. Press the button to enter the changes.
Retransmit all points from the DataHub to the viewer by pressing the button. This is useful to see those points that were created but haven't been assigned a value, such as through a call to the Gamma function read_point or register_point.
Press the circular close button in the window title bar to quit the Cascade DataHub Viewer.
In addition to the features in console mode, the X Windows mode of the Cascade DataHub Viewer has fields for changing point values, permanently displayed at the bottom of the viewer. It has a search feature, and its display includes a timestamp field for every point. It also highlights in red any locked points.
![[Note]](images/note.gif) | You must have GTK to use this mode. |
Type xdhview at the shell prompt to start the viewer.
Scroll up and down by using the scrollbar.
Find a point by typing its name in the Search entry field.
You can change data point values in the Cascade DataHub from the DataHub Viewer.
| New values get written as soon as the button is pressed. |
Choose a point by clicking on it. The point's information will be displayed in the data fields at the bottom of the viewer.
Edit a chosen point by deleting the existing entry; then type in the new information. Use the Tab key or click the mouse to move between fields. Press the button to remove all entries, ignoring any changes and keeping the original entries. Press the button to enter the changes.
| If you change the name of a point, the Cascade DataHub Viewer will automatically create a new point in the DataHub with that name and any entered values. |
Change a point type by clicking the appropriate button: , , or . Press the button to enter the changes.
Lock or unlock a point by clicking the or button. Press the button to enter the changes.
Write a new point by pressing the button and entering the point name, confidence (usually 100) and value. Press the button to enter the changes.
Retransmit all points from the DataHub to the viewer by pressing the button. This is useful to see those points that were created but haven't been assigned a value, such as through a call to the Gamma function read_point or register_point.
Press the square close button in the window title bar to quit the Cascade DataHub Viewer.
| |  | |
| 2.5. Mirroring Data to Windows or other nodes in Linux or QNX |  | 2.7. Features |
Copyright © 1995-2010 by Cogent Real-Time Systems, Inc. All rights reserved.