| OPC DataHub™ : Version 6.4 | ||
|---|---|---|
 | Chapter 6. Data Logging |  |
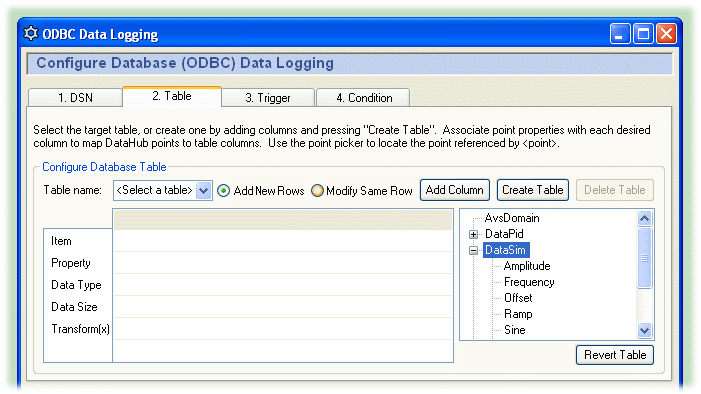
After you have set up a DSN you can create a table or select an existing one, and then assign points and properties to the columns of the table.

You need to either select an existing table, or create a new one.
Selecting a table allows you to use a table that you have created in your database program. When you select an existing table, you cannot add columns or change column names. To select a table, choose a table name from the drop-down list.
Creating a table provides a way to design and create a table from within this interface.
![[Note]](images/note.gif) | If, after creating the table, you need to make changes to it, and it has no data in it that you need, you can click the button. This will delete the table from the database but will leave all of the configuration you've done intact in this window. You can then add more columns or make changes to points and properties and recreate the table. This can be done as often as you need to. |
For any given table, whether existing or newly-created, you will need to decide whether you are going to add new rows, or modify the same row with new data each time it changes.
You have the option to make one column, often the first column in a table, a key column.
An auto-incrementing key is commonly configured for . A key column is optional for adding new rows, but if you choose to have one, it must be auto-incrementing. Please refer to Section 6.5, “Key Columns” for more details. An auto-incrementing key can be configured as follows:
|  |
A single key column is required for . The DataHub uses the key value to determine which row to modify. Please refer to Section 6.5, “Key Columns” for more details. The key can be configured as follows:
|  |
![[Note]](images/note.gif) | Due to a Windows bug, in the first column the interface won't respond unless you click directly below the text of the column name. We are working to resolve this. |
When you have selected a table, or you have at least one column in a table you are creating, you can assign points and their properties to the various columns.

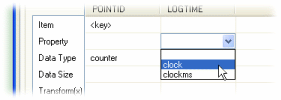
First, choose a point from the point-picker list on the right. Then click in the Item row and select <point> from the drop-down list. Optionally, you can type in the name of the point. Leaving the Item blank allows you to choose the Property of clock to display the system time, or clockms to display the number of milliseconds after the second of the system time.
Select which property of the point you want written to the database in this column:
The name of a the point shown in the Item field.
The value of the point shown in the Item field.
The quality of the point shown in the Item field.
The time stamp of the point shown in the Item field. This will include the milliseconds, but many databases, such as MS Access, ignore the milliseconds and store only the seconds. Other databases such as MySQL and MS SQL Server include the milliseconds in a time stamp. For example:
Databases like MySQL and MS SQL Server:
| Column A | |
| Enter for Property | timestamp |
| Enter for Data Type | datetime or timestamp or date |
Databases like MS Access:
| Column A | Column B | |
| Enter for Property | timestamp | timems |
| Enter for Data Type | datetime | number or integer |
The millisecond component of the timestamp, generally used in conjunction with timestamp. You only need this if your database cannot store the millisecond component of timestamp. timestamp.
The same as the timestamp, but in UTC time. You can use timems in conjunction with this as well.
The current system time. This will include the milliseconds, but like timestamp (above) many databases ignore the milliseconds and store only the seconds.
The millisecond component of clock, generally used in conjunction with clock. Like timems (above), you only need this if your database cannot store the millisecond component of clock.
![[Note]](images/note.gif) | Using clock and clockms - some tips: |
You must leave the Item field blank to select either of these options.

Example: If the time is 12:34:56.789, clock will be written as 12:34:56.789 in databases that accept milliseconds, and as 12:34:56 in databases that do not. A clockms property will be written as 789 in all databases.
The clock and clockms properties allow you to log the system time as a column in the table, so that your record can contain the system time along with a number of different point values, for example:
System Time      Point1      Point2      Point3
08:12:56.000     43.883       3.727     213.905
The data type that the database should associate with the property.
In some cases this is entered automatically, in other cases it is not used, but sometimes it is possible or necessary to enter a size, such as the number of characters in a text string, or the number of bytes.
This allows you to modify the entry or to insert a text string. For example:
(x * 100) + 25 could be used to multiply a point value by 100 and add 25 to the result.
"Tank Level" would insert the string Tank Level instead of, say, the point name.
Copyright © 1995-2010 by Cogent Real-Time Systems, Inc. All rights reserved.