6.3. Sending a Test Message
Once you have
configured the
mail server you can configure and send a test email. Here's how:
Open the Email/SMS Events window
- In the Cascade DataHub Properties window,
select Email/SMS
 .
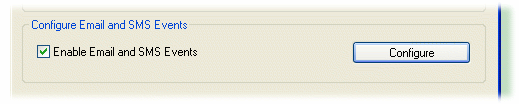
. In the Configure Email and SMS Events
section press the Configure
button.
This opens the Email/SMS Events window:
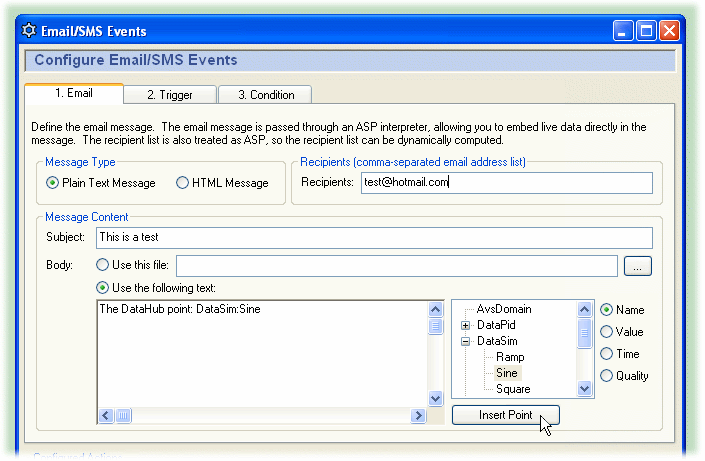
Define the Email Message
- Select the 1. Email tab.
- For the Message Type, choose
Plain Text Message.
- Enter a recipient email address in the
Recipients box. You can enter
several addresses, separated by commas.
- Enter a subject in the Subject box.
- For the Body, choose
Use the following text:.
- Start the DataSim program if it isn't already running,
and ensure that it is connected to the DataHub.
- In the point-picker list on the right, expand the
DataSim data domain and select the point named
Sine.
- Click the Name button to the
right of the point-picker list.
In the text entry field, type the following:
The DataHub point
Click the Insert Point
button. Your text display should now look like
this:
The DataHub point DataSim:Sine
Press Enter and continue typing:
The DataHub point DataSim:Sine
had a value of:
Click the Value button and
then click the Insert Point button.
Your text display should now look like this:
The DataHub point DataSim:Sine
had a value of: <%=$DataSim:Sine%>
Press Enter and continue typing:
The DataHub point DataSim:Sine
had a value of: <%=$DataSim:Sine%>
at the time:
Click the Time button and
then click the Insert Point button.
Your text display should now look like this:
The DataHub point DataSim:Sine
had a value of: <%=$DataSim:Sine%>
at the time: <%=PointTimeString(#$DataSim:Sine%)>
The message is ready. Now you can assign a trigger
and set a condition.
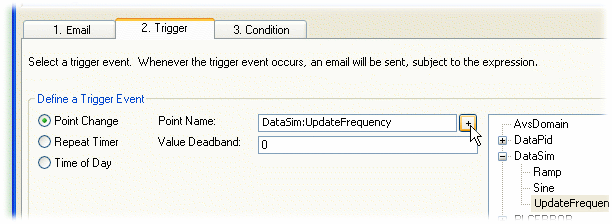
Assign a Trigger
For this example, we
will trigger the action on the
DataSim:UpdateFrequency point.
- Select the 2. Trigger tab.
- From the point selector, expand the
DataSim data domain and select the point
UpdateFrequency.
Click the + button to the
right of the Point Name field. The
point name DataSim:UpdateFrequency should fill
in for you.
![[Note]](images/note.gif) | You can choose any point for the
trigger, including the point that gets written, such
as DataSim:Sine in our example.
For more information about triggers, please refer to
Section 6.5, “Assigning a Trigger”. |
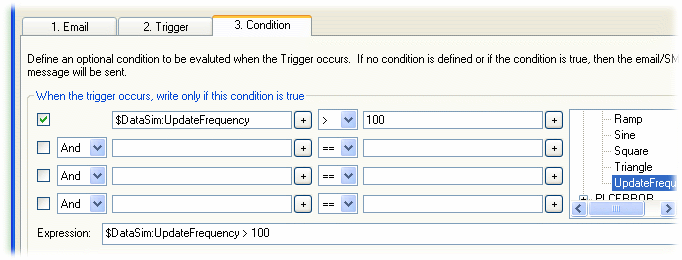
Set a Condition and Configure the Action
For this example, let's limit the trigger on the
DataSim:UpdateFrequency point to changes
only to values over 100.
- Select the 3. Condition tab.
- Click the checkbox in the first row.
- From the point selector, expand the
DataSim data domain and select the point
UpdateFrequency.
- Click the + button in the
left column. The text
$DataSim:UpdateFrequency should fill in
the box.
- From the drop-down box, choose the
> operator.
In the right column, enter the number
100. Your screen should now look like
this:
You have set the condition. The expression at
the bottom shows what will be passed to Gamma, the
internal scripting engine of the DataHub.
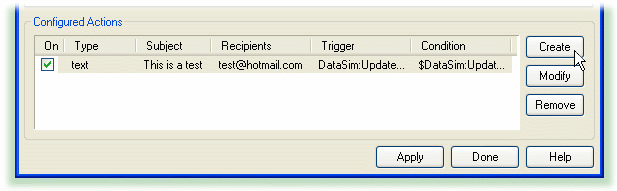
Go down to the Configured
Actions box and click the
Create button.
A new configured action should appear in the
list. This is a summary of what you have done. When a
configured action is selected in this list, you can make
changes in any of the tabs and modify it using the
Modify. You can also duplicate a
configured action using the
Create
button, or remove it with the
Remove button. For more
information about configured actions, please refer to
Section 6.7, “Configured Actions”- Click the Apply button to
activate the configured action. Now let's see how it all
works.
Trigger and Send an Email
The action
you just configured causes the DataHub to send an email any
time the DataSim Update Frequency is changed to a value
greater than 100. To test the script, you'll need to trigger
it by changing that value in the DataSim.
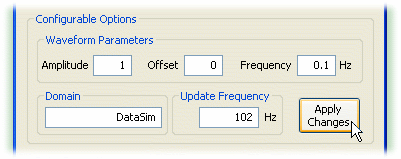
- In DataSim, press the More...
button to view the Configurable
Options
Change the Update Frequency to
a number greater than 100 and click the
Apply Changes button to commit the
change.
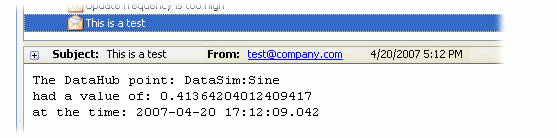
Check the email account of the recipient. You should
have received a message that looks like this:
Each time you enter a new Update
Frequency value greater than
100 in the DataSim, the DataHub script
will send a similar message.
You have just configured and tested an action that sends
an email with the name, value, and timestamp of the
Sine point in the
DataSim data domain whenever the value of the
UpdateFrequency point changes to a value
over 100. Now you can configure other emails to send your own
text messages or HTML pages. The remaining sections in this
chapter explain the interface in more detail