| Cascade DataHub™ : Version 6.4 | ||
|---|---|---|
 | Chapter 12. Properties Window |  |
| Cascade DataHub™ : Version 6.4 | ||
|---|---|---|
| | Chapter 12. Properties Window | |
 | This option in the Properties Window opens the Bridging interface where you can set up data bridging. Bridging means connecting points from two different DataHub clients so that when one point changes, its value gets written to the bridged point. You can set up the bridge to be one-way in either direction, or bidirectional. In addition, you can transform the data as it passes through the DataHub, using linear transformations. |
This setting enables and disables bridging globally for the whole Cascade DataHub.
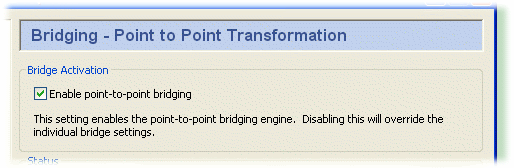
Ensure the box is checked to enable bridging. Uncheck the box to disable bridging.
This shows the total number of bridges that have been configured, and how many of them are currently active.
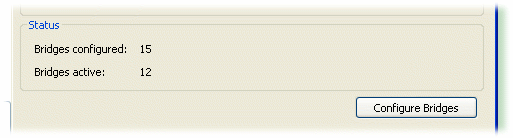
Click the button to open the Bridge Configuration window:
The following sections give an overview of bridge configuration. For step-by-step instructions, please refer to Section 3.3, “Configuring Bridges”.
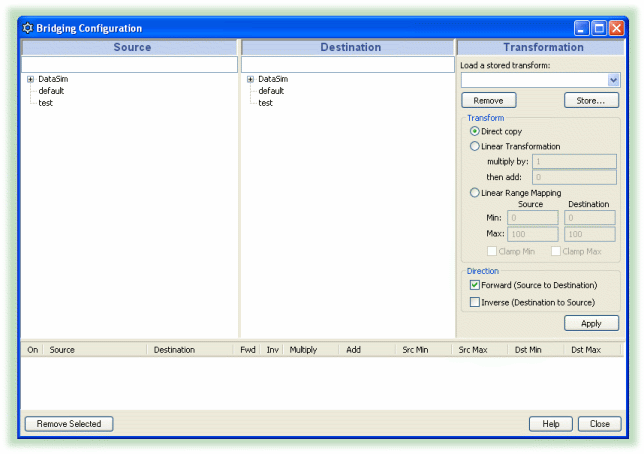
This is where you select the points to be bridged—a source point and a destination point.
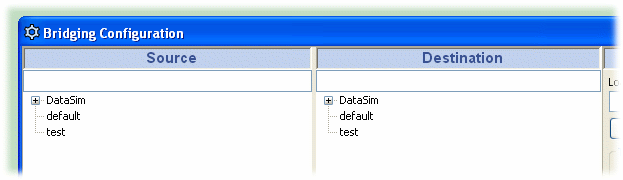
You can click on the point you need, or enter the name in the data-entry box at the top of the column.
You can store transformations and retrieve them by name later on.
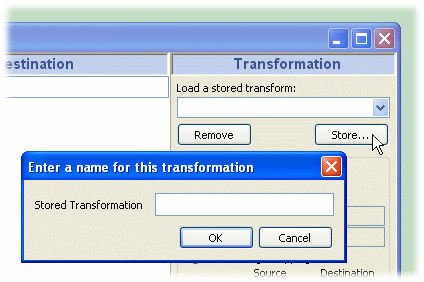
To save a transformation, click the button and enter a name in the pop-up box. Once stored, the transformation will become available by name in the drop-down list.
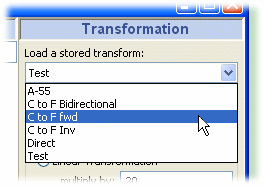
To load a transformation, simply select its name from the list.
Specify the type of transformation by clicking , , or .
makes no transformations. It just copies the point.
lets you multiply by one value and add another value, such as in the equation y = mx + b where the destination point is y, the source point is x, the multiply by value is m, and the then add value is b. For example to transform a Celsius source point to a Fahrenheit destination point, you would multiply by 1.8 and add 32, or
Fahrenheit = (1.8 X Celsius) + 32
If you have selected the direction for a transformation, you will get the inverse of the transformation. In this example, you would get a conversion from Fahrenheit to Celsius, or the results of this equation:
Celsius = (Fahrenheit - 32) / 1.8
As an alternative to entering transformation values, the DataHub also offers Linear Range Mapping.
lets you enter a range for the source and destination, and the DataHub automatically calculates the corresponding linear transformation. For example, to create the same Fahrenheit to Celsius transformation, you could use the defaults of 0 and 100 for the Min and Max of the source point. Then you would enter 32 and 212 for the Min and Max of the destination point. As soon as you make these entries, the correct values get entered automatically in the Linear Transformation.
When you use linear range mapping, you can limit the transformed value to the maximum and minimum by checking the boxes. The clamps get applied to the point being changed, ie. to the destination point for forward direction, to the source point for inverse direction, and to both points for bidirectional bridges.
Decide which direction you want the bridge to apply.
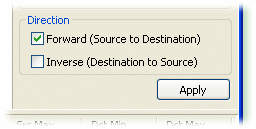
Select to change the destination point when the source point changes, but not change the source when the destination changes. Select to change the source point if the destination point changes, but not vice-versa. Select both boxes for a bidirectional bridge, where either point changes whenever the other point changes.
![[Note]](images/note.gif) | Selecting the inverse direction will apply the inverse of the transformation, as explained below. |
Click the button to create and activate the bridge. The DataHub will create the bridge and update the bridged points immediately.
Here you can see all the bridges that exist in the system, and the significant information about them.
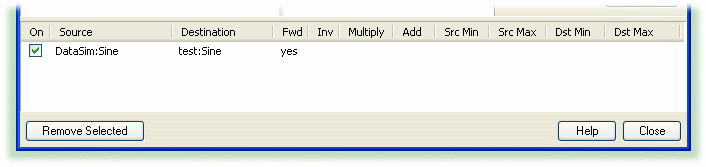
If you click on a transformation, the source point, destination point, and transform information get displayed in their respective panels. Use the check box at the front of each bridge to activate or deactivate that particular bridge.
| |  | |
| 12.3. Tunnel/Mirror |  | 12.5. Email |
Copyright © 1995-2010 by Cogent Real-Time Systems, Inc. All rights reserved.