| Cascade DataHub™ : Version 6.4 | ||
|---|---|---|
 | Chapter 4. Connecting Microsoft Excel |  |
The Cascade DataHub can send and receive the data contained in an entire range of an Excel spreadsheets. This data is treated as an array, a two-dimensional range of cells as rows and columns. The array can be as big as necessary (within point size limits), or as small as a single cell—at least one row and one column.
Excel transmits array data as a tab-and-newline delimited text string of values. Each value in a row is separated by a tab, and each row is separated by a newline character. The string does not contain any information concerning the source range of the array within the spreadsheet.
There are two methods of transmitting a range, or array data, from Excel to the Cascade DataHub. These exactly match the mechanisms used for individual point data: DDEPoke and DDEAdvise.
A DDEPoke command can be issued by Excel to send data to the Cascade DataHub based on a trigger within Excel. For this to work, the Cascade DataHub needs to be configured to act as a DDE server and have registered at least one service name. An Excel macro can then issue a DDEPoke to that service, along with a Cascade DataHub data domain name (the DDE topic), a point name (the DDE item) and a value. If the value is of type Range then Excel will automatically format the value as a tab-and-newline separated string.
Example: See the definition of the PutData function in the Excel macro coding examples below.
When sending data from Excel to the Cascade DataHub using a DDE advise loop, Excel acts as the DDE server and the DataHub acts as the client. To create the advise loop:
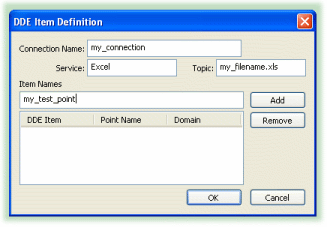
Connection Name: choose a name to identify this connection. It must be unique among all DDE connections.
Service: type in Excel (case is not important).
Topic: type the name of your worksheet file, including the .xls extension, like this: my_filename.xls.
Item Names: These create a mapping between Excel cells and ranges, and Cascade DataHub point names. You may specify a single cell in r1c1 format, a range of cells in r1c1:r2c2 format, a cell name, or a range name as the DDE Item name. For example:
| r2c5 | - accesses the cell E2 (second row, fifth column) |
| r3c3:r5c9 | - accesses the range C3:I5 |
| MyRange | - accesses the cell or range that is named MyRange |
![[Note]](images/note.gif) | Check the names in the Point Name and Data Domain columns. If either of them is not what you need, double-click it to select it, and change it. |
There are two ways to drag and drop data into Excel to create a range, using DDE advise loops. Or you can use DDE Request and macros.
Here is how you can collect a group of points in the DataHub and drag them all into Excel, where the data for each point occupies a unique cell.
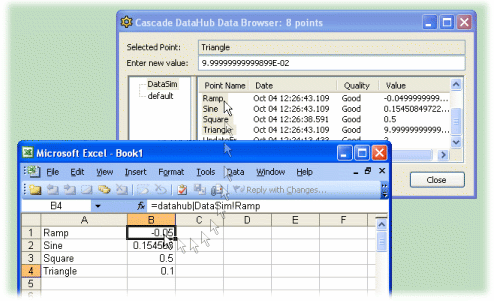
![[Note]](images/note.gif) | You can drag and drop point names, timestamps, and other attributes of a point using the Property dropdown list. Please refer to Drag and Drop Style and Property in the Data Browser section for more details. |
Here is how you can take a single point in the DataHub whose value is an array, and have each value in the array occupy a unique cell in Excel.
To demonstrate this, we are going to first combine the two procedures shown above to create an array in the DataHub
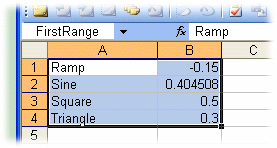
Connection Name: type in Ranges.
Service: type in Excel.
Topic: type in Book1, or the name of your worksheet file including the .xls extension.
Item Names: Type in FirstRange.

For simplicity's sake we are going to just put the same array back into Excel.
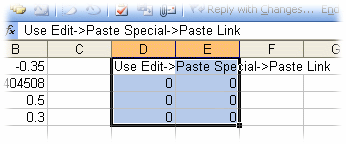
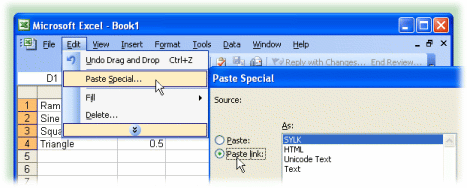
If you are creating macros in Excel to read data from the Cascade DataHub, you can use the DDERequest function call. This will return an array type value that can be written directly into any range in the spreadsheet. If the array data is larger in any dimension than the range into which it is written, then extra data in the array is discarded. If the array data is smaller than the target range then extra cells in the range are filled by repeating the data in the array. See below for an Excel macro that dynamically determines the target range to ensure that all array data is entered into the spreadsheet with no duplication.
The following macros represent the entire macro set for a simple test spreadsheet that reads and writes a single array point in the Cascade DataHub. The two functions GetData and PutData can be attached to buttons on a spreadsheet for easy testing. The PutData subroutine contains two alternative representations of the source range, one of which is commented out in the macro.
Sub GetDataArray(Channel As Integer, SheetName As String, DataPoint As String, _
                 StartRow As Integer, StartCol As Integer)
    Dim NRows As Integer, NCols As Integer

    ' This sub performs a DDERequest for DataPoint in the DDE Channel and reads in a tab
    ' delimited array with carriage returns at the end of each line. It then fills a range
    ' of cells with the data. The native format for Excel data is tab delimited text with a
    ' carriage return at the end of each row of data. If we assign this type of data to a
    ' range of cells using the FormulaArray function, Excel automatically parses the data
    ' and fills it into the specified range.  The real trick here is to ensure that the
    ' range is the same size as the incoming data, so we do not have to know the size
    ' a priori.

    DataArray = DDERequest(chan, DataPoint)   ' request DataPoint from Channel

    ' find the upper row and column bounds for the variant array

    If StartCol = 0 Then StartCol = 1   ' Starting column where data will go in our sheet
    If StartRow = 0 Then StartRow = 1   ' set the starting row
    NCols = 1                           ' set default number or columns to 1
    On Error Resume Next                ' ignore errors (error occurs if array has
                                        '                one dimension)

    ' get upper bound of the array columns
    ' the following line will generate an error if the array is only a one dimensional array
    ' We just skip this, and use the default 1
    NCols = UBound(DataArray, 2)

    On Error GoTo 0                     ' allow errors
    NRows = UBound(DataArray, 1)        ' get upper bound of array y dimension

    NRows = NRows + StartRow - 1        ' add offset from StartRow - this is the ending row
    NCols = NCols + StartCol - 1        ' add offset from StartCol - this is the ending col

    ' the following line fills up the cells in the range starting in "StartCol:StartRow" to
    ' "Nrows:Ncols" with the data from the variant array
    Sheets(SheetName).Range(Cells(StartRow, StartCol), Cells(NRows, NCols)) = DataArray
End Sub

Sub PutDataArray(Channel As Integer, SheetName As String, DataPoint As String, _
                 StartRow As Integer, StartCol As Integer, NRows As Integer, _
                 NCols As Integer)
    DDEPoke Channel, DataPoint, Sheets(SheetName).Range(Cells(StartRow, StartCol), _
            Cells(StartRow + NRows - 1, StartCol + NCols - 1))
End Sub
Sub PutDataRange(Channel As Integer, DataPoint As String, DataRange As Range)
DDEPoke Channel, DataPoint, DataRange
End Sub
Sub GetData()
'
' This is a test function assigned to a button. It reads a test point into
' an arbitrarily sized matrix starting at A10
'
Dim chan As Integer
chan = DDEInitiate("datahub", "default")
GetDataArray chan, "Sheet1", "TestArray", 10, 1
DDETerminate (chan)
End Sub
Sub PutData()
'
' This is a test function assigned to a button. It writes a 3 row x 5 column
' area of Sheet1 into a single data point in the DataHub. You can use either
' PutDataArray or PutDataRange, depending on how you wish to specify the range.
'
Dim chan As Integer
chan = DDEInitiate("datahub", "default")
'PutDataArray chan, "Sheet1", "TestArray", 1, 1, 3, 5
PutDataRange chan, "TestArray", Sheets("Sheet1").Range("A1:E3")
DDETerminate (chan)
End SubCopyright © 1995-2010 by Cogent Real-Time Systems, Inc. All rights reserved.